I started to write out steps for getting started with KVM for about the third time in a month so this seems like a good time to make a standalone guide.
First off, what's KVM and why are folks so interested in Firecracker? KVM, or kernel virtual machines, was introduced in 2006 after AMD and Intel added a new permission ring to CPU instruction sets that allowed guests to run with different permission levels than the host; prior to that you either had a type 2 hypervisor or you had to do a bunch of emulation like what Zen did. KVM was subsequently merged into Linux itself and its development has been part of the kernel ever since. What's cool about KVM is that each guest gets its own kernel and isolated user space; that paradigm isn't possible with a container. KVM has the potential to create and manage very lightweight VMs that are incredibly fast to boot and can be ran very densely on your hardware, which is what Firecracker is designed to do. Firecracker uses KVM modules and provides a VMM (virtual machine monitor) for managing the VMs themselves.
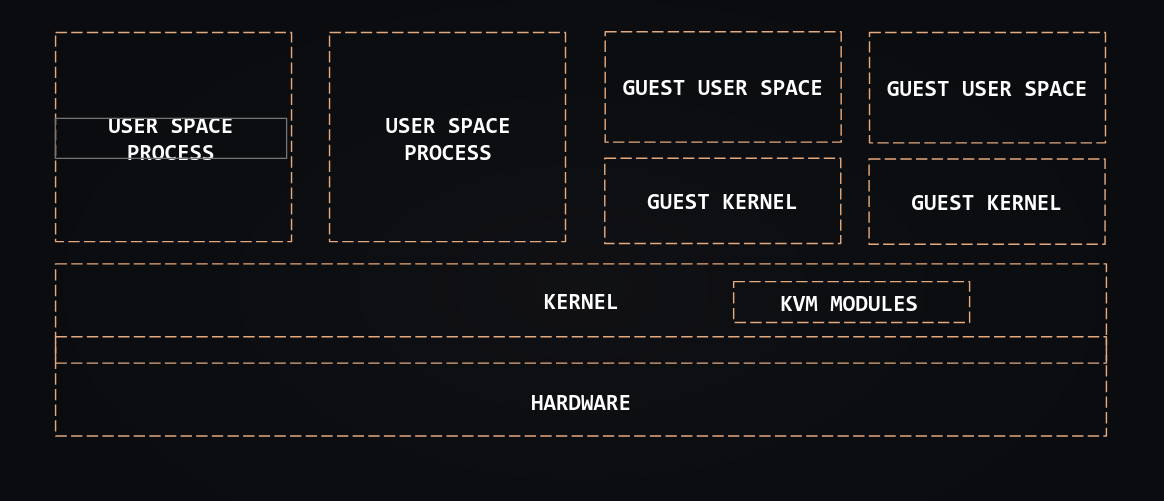
Setup KVM & Firecracker
Basically all modern hardware supports KVM, we just need to make sure its enabled and permissions are setup correctly. Then, running a VM requires a kernel for the guest as well as the rootfs, or root filesystem, which is what most people refer to when they say "image".
Here's a helpful guide from the Firecracker folks themselves: Getting Started with Firecracker
First, we need to ensure that KVM is enabled and we have access:
# check that KVM is enabled
lsmod | grep kvm

# check if your user is in the KVM group:
groups

# If not, check that the group exists and add your user to it:
getent group kvm

# If the group exists, add your user to it:
[ $(stat -c "%G" /dev/kvm) = kvm ] && sudo usermod -aG kvm ${USER} \
&& echo "Access granted."

# either reboot or run this to activate changes:
newgrp kvm
Great, once KVM is ready to go for your user, let's install firecracker:
# from the official docs, get the latest:
ARCH="$(uname -m)"
release_url="https://github.com/firecracker-microvm/firecracker/releases"
latest=$(basename $(curl -fsSLI -o /dev/null -w  %{url_effective} ${release_url}/latest))
curl -L ${release_url}/download/${latest}/firecracker-${latest}-${ARCH}.tgz \
| tar -xz

# Rename the binary to "firecracker"
mv release-${latest}-$(uname -m)/firecracker-${latest}-${ARCH} firecracker

# Now move the binary somewhere in your PATH:
sudo mv firecracker /usr/local/bin/
Bonus! Before we move on, ensure that heyvm is also installed:
curl -fsSL https://heyo.computer/heyvm/install.sh | sh

# by default its installed to ~/.local/bin/heyvm
# ensure its in your PATH:
Get a Kernel
The firecracker maintainers provide a kernel you can use, https://kernel.org/ has them or you can download one directly if you have the heyvm CLI installed - heyvm mvm fetch-kernel
Here's how to get the latest from the firecracker team's CI:
ARCH="$(uname -m)"
S3="https://s3.amazonaws.com/spec.ccfc.min"

# Fetch latest CI artifact build. `sort` + `tail` returns artifacts with latest YYYYMMDD.
CI_ARTIFACTS_PREFIX=$(curl -fsSL "$S3?list-type=2&prefix=firecracker-ci/&delimiter=/" \
    | grep -oP "(?<=<Prefix>)firecracker-ci/[0-9]{8}-[^/]+/(?=</Prefix>)" \
    | sort \
    | tail -1)

latest_kernel_key=$(curl -fsSL "$S3?list-type=2&prefix=${CI_ARTIFACTS_PREFIX}${ARCH}/vmlinux-" \
      | grep -oP "(?<=<Key>)(${CI_ARTIFACTS_PREFIX}${ARCH}/vmlinux-[0-9]+\.[0-9]+\.[0-9]{1,3})(?=</Key>)" \
      | sort -V \
      | tail -1)

# Download a linux kernel binary
wget "$S3/${latest_kernel_key}"

latest_ubuntu_key=$(curl -fsSL "$S3?list-type=2&prefix=${CI_ARTIFACTS_PREFIX}${ARCH}/ubuntu-" \
      | grep -oP "(?<=<Key>)(${CI_ARTIFACTS_PREFIX}${ARCH}/ubuntu-[0-9]+\.[0-9]+\.squashfs)(?=</Key>)" \
      | sort -V \
      | tail -1)
ubuntu_version=$(basename $latest_ubuntu_key .squashfs | grep -oE '[0-9]+\.[0-9]+')

# Download a rootfs from Firecracker CI
wget -O ubuntu-$ubuntu_version.squashfs.upstream "$S3/$latest_ubuntu_key"

# The rootfs in our CI doesn't contain SSH keys to connect to the VM
# For the purpose of this demo, let's create one and patch it in the rootfs
unsquashfs ubuntu-$ubuntu_version.squashfs.upstream
ssh-keygen -f id_rsa -N ""
cp -v id_rsa.pub squashfs-root/root/.ssh/authorized_keys
mv -v id_rsa ./ubuntu-$ubuntu_version.id_rsa
# create ext4 filesystem image
sudo chown -R root:root squashfs-root
truncate -s 1G ubuntu-$ubuntu_version.ext4
sudo mkfs.ext4 -d squashfs-root -F ubuntu-$ubuntu_version.ext4

# Verify everything was correctly set up and print versions
echo
echo "The following files were downloaded and set up:"
KERNEL=$(ls vmlinux-* | tail -1)
[ -f $KERNEL ] && echo "Kernel: $KERNEL" || echo "ERROR: Kernel $KERNEL does not exist"
ROOTFS=$(ls *.ext4 | tail -1)
e2fsck -fn $ROOTFS &>/dev/null && echo "Rootfs: $ROOTFS" || echo "ERROR: $ROOTFS is not a valid ext4 fs"
KEY_NAME=$(ls *.id_rsa | tail -1)
[ -f $KEY_NAME ] && echo "SSH Key: $KEY_NAME" || echo "ERROR: Key $KEY_NAME does not exist"
Build a Roof Filesystem
If you followed the instructions from the firecracker gang, you have a testable Ubuntu kernel ready to go. However, that probably isn't your end game. See our guide here about using Docker to build out a custom rootfs.
Creating a VM
Creating a VM requires a VMM running to manage it, that's Firecracker's role. You can use the heyvm CLI to directly create a VM with KVM, or you can install virsh as well for a similar experience. Since we already have firecracker, let's run it and create a VM:
API_SOCKET="/tmp/firecracker.socket"

# Remove API unix socket (e.g. restarts)
sudo rm -f $API_SOCKET

# Assuming you moved it somewhere useful:
sudo firecracker --api-sock "${API_SOCKET}" --enable-pci
If you installed heyvm, starting a VM is a one line affair:
# firecracker:
heyvm create --name my-vm --backend-type firecracker --image vm-image

# plain ole kvm:
heyvm create --name my-vm --backend-type kvm --image vm-image
Want to do it the verbose way? You need to attach devices and disks yourself (note this is from firecracker's getting started guide, linked above):
TAP_DEV="tap0"
TAP_IP="172.16.0.1"
MASK_SHORT="/30"

# Setup network interface
sudo ip link del "$TAP_DEV" 2> /dev/null || true
sudo ip tuntap add dev "$TAP_DEV" mode tap
sudo ip addr add "${TAP_IP}${MASK_SHORT}" dev "$TAP_DEV"
sudo ip link set dev "$TAP_DEV" up

# Enable ip forwarding
sudo sh -c "echo 1 > /proc/sys/net/ipv4/ip_forward"
sudo iptables -P FORWARD ACCEPT

# This tries to determine the name of the host network interface to forward
# VM's outbound network traffic through. If outbound traffic doesn't work,
# double check this returns the correct interface!
HOST_IFACE=$(ip -j route list default |jq -r '.[0].dev')

# Set up microVM internet access
sudo iptables -t nat -D POSTROUTING -o "$HOST_IFACE" -j MASQUERADE || true
sudo iptables -t nat -A POSTROUTING -o "$HOST_IFACE" -j MASQUERADE

API_SOCKET="/tmp/firecracker.socket"
LOGFILE="./firecracker.log"

# Set log file
sudo curl -X PUT --unix-socket "${API_SOCKET}" \
    --data "{
        \"log_path\": \"${LOGFILE}\",
        \"level\": \"Debug\",
        \"show_level\": true,
        \"show_log_origin\": true
    }" \
    "http://localhost/logger"

KERNEL="./$(ls vmlinux* | tail -1)"
KERNEL_BOOT_ARGS="console=ttyS0 reboot=k panic=1"

ARCH=$(uname -m)

if [ ${ARCH} = "aarch64" ]; then
    KERNEL_BOOT_ARGS="keep_bootcon ${KERNEL_BOOT_ARGS}"
fi

# Set boot source
sudo curl -X PUT --unix-socket "${API_SOCKET}" \
    --data "{
        \"kernel_image_path\": \"${KERNEL}\",
        \"boot_args\": \"${KERNEL_BOOT_ARGS}\"
    }" \
    "http://localhost/boot-source"

ROOTFS="./$(ls *.ext4 | tail -1)"

# Set rootfs
sudo curl -X PUT --unix-socket "${API_SOCKET}" \
    --data "{
        \"drive_id\": \"rootfs\",
        \"path_on_host\": \"${ROOTFS}\",
        \"is_root_device\": true,
        \"is_read_only\": false
    }" \
    "http://localhost/drives/rootfs"

# The IP address of a guest is derived from its MAC address with
# `fcnet-setup.sh`, this has been pre-configured in the guest rootfs. It is
# important that `TAP_IP` and `FC_MAC` match this.
FC_MAC="06:00:AC:10:00:02"

# Set network interface
sudo curl -X PUT --unix-socket "${API_SOCKET}" \
    --data "{
        \"iface_id\": \"net1\",
        \"guest_mac\": \"$FC_MAC\",
        \"host_dev_name\": \"$TAP_DEV\"
    }" \
    "http://localhost/network-interfaces/net1"

# API requests are handled asynchronously, it is important the configuration is
# set, before `InstanceStart`.
sleep 0.015s

# Start microVM
sudo curl -X PUT --unix-socket "${API_SOCKET}" \
    --data "{
        \"action_type\": \"InstanceStart\"
    }" \
    "http://localhost/actions"

# API requests are handled asynchronously, it is important the microVM has been
# started before we attempt to SSH into it.
sleep 2s

KEY_NAME=./$(ls *.id_rsa | tail -1)

# Setup internet access in the guest
ssh -i $KEY_NAME root@172.16.0.2  "ip route add default via 172.16.0.1 dev eth0"

# Setup DNS resolution in the guest
ssh -i $KEY_NAME root@172.16.0.2  "echo 'nameserver 8.8.8.8' > /etc/resolv.conf"

# SSH into the microVM
ssh -i $KEY_NAME root@172.16.0.2

# Use `root` for both the login and password.
# Run `reboot` to exit.
Next steps
If you haven't built out a custom rootfs, start there: https://heyo.computer/guides/building-custom-kvm-images.html
Here's an example for creating a Postgres VM from our guide on running serverless postgres.